When you’re planning your next door automation project for a swing door, choose the DIGIWAY Spring Return door operator. We’ve made it as simple as possible to fit and configure this discreet and reliable unit. This guide gives you an overview of the key stages involved in the installation process, from the initial assessment of the site to the final compliance checks. This isn’t a detailed technical manual (you can find that on our website here), but it gives you an understanding of what’s involved.
But let’s roll it back for a second. Before embarking on installing any DIGIWAY door operators, we recommend that you undergo professional training. Luckily, that’s not so difficult, as the CDVI Academy offers in-depth installer training for DIGIWAY units completely free of charge! Register today and get yourself ready to learn.
In addition, we also recommend that anyone installing automatic doors completes training on the EN16005 regulations. You can access this training from either of the two door automation associations: the ADIA or the ADSA.
Now, let’s get started…
1 – Assess the Installation Site
Before you get out any products or tools, your essential first step is a thorough assessment of the installation site. What do the door and frame look like? Are they in good condition, stable and strong enough to hold the DIGIWAY unit? Check for any warping or misalignment issues that could cause you trouble further down the line. Then, check for clearance above the door. You need enough space up there to mount the door automation unit, with the arm coming downwards to meet the top of the door.
Next, check where your power is coming from. The DIGIWAY SR requires a 240V mains supply, so safety is vital. Make sure the supply is safe and in accordance with all electrical standards. And finally, think about who’s using the door on a regular basis. Is it a high-traffic area such as a public building or busy office? Will the majority of the users be able-bodied, or will they be disabled or less mobile people, such as in a care home or assisted living environment? You may need to make accommodations for the types of users expected.

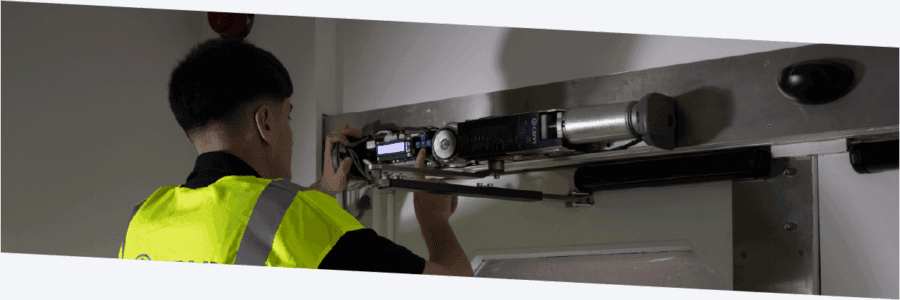
2 – Fit the DIGIWAY Door Automation Unit
Once you’re happy with the installation site and you’ve got power ready to go, it’s time to fit the DIGWAY unit to the wall. Luckily, we’ve made this easy for you with our handy back-plate design. The DIGIWAY unit weighs about 10kg – nobody wants to be holding that above their head with one hand while the other one holds a drill and your magic third hand keeps the level in place. All you need to do is take the metal backplate and use the template provided to position it accurately on the wall. Ensure that the mounting will be on a solid part of the wall or transom, then mark the fixing holes. Then you can securely screw the backplate to the wall and ensure the cables are where they need to be. After that, the DIGIWAY unit simply locates onto the backplate and fixes in place. It’s safer, easier, and quicker.
3 – Attach the Arm to the Door
You should already know which arm you need by this point. But as a reminder, the sliding arm is for pulling the door open inwards. The articulated arm is for pushing the door open outwards. Luckily, we include both in every DIGIWAY pack so you only ever need to order one product.
Next, fix the arm to the door leaf, using the guide in the installation manual to position it correctly relative to the door operator. Then ensure the arm and the door operator are connected together properly, and test that the arm moves freely when the door is opened and closed. You may need to make small adjustments to ensure smooth and safe movement across the full range of motion.
4 – Configure and Calibrate the DIGIWAY
Now everything is safely fitted to the door, it’s time to wire everything and power up! Detailed wiring diagrams are laid out in the installation manual. When you’re ready, switch on the DIGIWAY and check that the LCD screen shows the configuration menu. Then you have a choice. There are three ways you can navigate through the DIGIWAY menus. First, you can use the five blue buttons on the front of the DIGIWAY unit itself. Or, you can use the hand-held transmitter included in the pack, once it’s added to the DIGIWAY as a “Master TX“(transmitter). And finally, if your DIGIWAY unit is equipped with the Bluetooth connection module, you can use our smartphone app, which mirrors the unit’s LCD screen display.

However you choose to operate the DIGIWAY, it’s now time to get it going. There are six key steps to follow here: initial setup, spring preload, configuration, calibration, adjustment, and advanced parameters.
Initial setup. This is just selecting the language you want the DIGIWAY to display and adding the master transmitter to control the menu. Please note that this master transmitter should never be given to the end user. Always add standard transmitters for end users.
Spring preload. Inside the DIGIWAY Spring Return, there is – surprise, surprise – a spring. This torsion spring enables the door to close itself without utilising mains power. The holding force when the door is closed is determined by the level of preload set on the spring. Your job is to find the right balance between closing and holding force. Closing should be as soft as possible to allow users to easily push the door open manually if needed, but still retain full closing power. Please note that the DIGIWAY SR is does not lock the door and should be used as a lock. Follow the steps in the manual to configure this according to the site’s needs.
Configuration. There are a lot of different parameters you can configure on a DIGIWAY. For example, the presence and type of electronic lock on the door, whether users can push the door to open it automatically, how the door stays closed properly in a windy area. This is where your thorough assessment of the site at the beginning of the project comes in useful!
Calibration. The DIGIWAY unit calibrates itself – time for a cup of tea. Follow the steps in the manual to navigate the menus and initiate calibration. The process doesn’t take long – the door operator runs five consecutive cycles, opening and closing the door to its fullest extent five times. This enables the DIGIWAY to calculate the precise specifications of the door, any resistance points it may have, and the amount of electrical current needed to fully open and close it. This measurement of the current acts as a fail-safe obstacle detection tool to prevent injury or damage in case the safety sensors don’t operate as expected. If an obstacle lies in the path of the moving door, and the DIGIWAY unit detects an unexpected increase in the current needed to drive the door open, or a deceleration of the opening speed, it immediately ceases movement.
Adjustment. This is fine-tuning the operation of the DIGIWAY to ensure safe and smooth movement at your site. Again, there are a lot of things you can adjust slightly here – please see the manual for a full overview.
Advanced parameters. Yes, there are even more settings to tailor your DIGIWAY to the site in the Advanced Settings menu. You might want to alter the lock release delay, the opening jolt delay, the opening jolt torque, or the maximum number of obstacle detections the door will attempt before stopping and waiting to be told what to do next. All this and more is in your Advanced Settings.
5 – Ensure EN16005 Compliance
Once your door is working as expected and operating smoothly and safely, it’s time to ensure that it complies with regulations. EN16005 applies to all automatic doors so complying is not optional! However, that doesn’t mean it’s difficult. If you’ve bought one of our handy EN16005 DIGIWAY kits, you already have a range of other products to help you achieve compliance.
Safety sensors. Presence and motion detectors should always be in place for automatic doors. This is particularly important for swing doors, which often open into a corridor where traffic is passing by the door’s path. Sensors prevent accidental contact with the moving door, reducing the risk of injury. Remember, sensors are for the safety of people, as the door should not touch the user. Obstacle Detection is for physical objects that might block the door’s path.
Finger guards. If your door has an exposed hinge line, there’s a risk of trapped fingers, especially in an environment where children are present. Finger guards should be fitted to the hinge line to cover the risky gap and prevent injury.
Signage. Clear and obvious signage warning people of the presence of the automatic door is required to comply with the EN16005 regulations.
Remember this list is not exhaustive – you might also need safety barriers or other measures to be fully compliant. And don’t forget to rigorously test all your safety functions. Not only does this improve safety for everyone, it also covers you legally and in terms of insurance in the event of any accident. A risk assessment should always be carried out before installation.

6 – Final checks and handover
So, you’ve installed all the hardware. You’ve wired everything up safely. You’ve configured and calibrated the DIGIWAY. You’ve added safety sensors, finger guards, and signage. Now you’re ready to test the full and complete operation cycle of your door. Is it opening and closing when it’s supposed to? Is its movement smooth and free of jolts or resistance? Does it stop when obstacles are detected? Check everything and then check it again!
Once you’re happy, train your customers in how to operate the DIGIWAY and always leave documentation for them to refer to in the future. The user manual and warranty info are always useful. Finally, log the installation for future servicing requirements.
Installing DIGIWAY door operators
Installing DIGIWAY swing door operators requires skill and experience and attention to detail. Every door on every site will be a little bit different. And you’ll have to adjust your approach to the installation depending on those difference factors. But this guide has given you an overview of the basic steps involved. Plus, you’re coming to CDVI Academy training before you start installing, right? So you’ll be an expert by the time you get to site. And even then, you’ll read the manual and follow the steps in detail, right? You’ve got support at every step. You’ve got this!